Like this Blog on FB

Showing posts with label Java Script. Show all posts

Monday, December 13, 2010

Change the Scroll Bar Color - Silverlight


Hello Folks,

Here I hit the Bloggers' world all over again. Yes... with a technical posting.
Here is a very brief description of the problem:

The color of the silverlight scroll bar was looking very ugly in one of my projects and it needs to be changed. Am so sure that the regular, default pale scroll bars suck most of the time. But, we lazy coders never seem to care to change it. Rather we tend to compromise. When it 'NEEDS' to be changed. Please go ahead and follow the post. Few simple steps and a few minutes of time, You are done.

Tools Needed: Microsoft Expression Blend.

Time taken: 5 Mins.

When you are all set start off with this

Step 1: Open a new project in Expression Blend and drag a scroll viewer control on to the Layout.


Step 2:

o Go to Objects and timeline,

o Right click on the Scroll Viewer

o Click on Edit Template and

o Select edit a copy


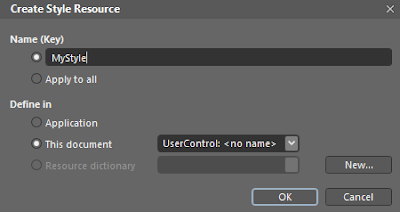
Step 3: Specify a name in the Dialog Box that appears.

Step 4: Once you do so you will find the scroll viewer being made by mending many bits and pieces viz. Scroll Content Presenter, Rectangle, Vertical Scroll Bar, Horizontal Scroll Bar etc.


Now, that we have already got the individual parts. Here starts the customization part.

Step 5: Select the individual element you want to customize or change in the scroll viewer. My target now is to change the color of the scroll bar. So I select the Horizontal Scroll bar. And repeat the Step #2.

Step 6: Specify a name in the Dialog Box that appears. Make sure that you give a meaningful name and remember it to use it at a later time. Otherwise you might end up in ruckus.

Step 7: You can now see that the Horizontal Scroll bar is made of few more isolated components such as Rectangles, Horizontal Thumbs etc. The Horizontal thumb is the actual scrolling part of the scroll bar which can be moved. So our aim is to change its default color. Repeat the Step #2 on the Horizontal Thumb. In the dialog box give any meaningful name.

Step 8: Now we arrive at a destination of the real work. The thumb is made of a group of nothing but just rectangles . In order to change the basic Look and Feel of the Scroll Bar, select the “Background gradient” rectangle and navigate to the Properties window.

You can see all the colors are set to white in the Properties panel. Now unleash the designer in you and sharpen the creativity as you proceed with the next step.

Step 9: Change the colors on the gradient bar to the colors you wish to or the colors you are demanded for. You can change the no of colors and order of the colors. I now stick to 4 colors and change them to violet and shades of violet.

P.S : Change the BackgroundMouseOver Rectangle colors in the same manner. If you don’t do so your Scroll Bar looks like some south Indian comedian’s Black oily face …in short UGLY

Step 10: Click on the Return to scope and Underlined Upper Arrow button in the Objects and Timeline window(see the Image). Click the same button till you reach the Layout root level where you see the Scroll Viewer


Step 11: Now its Climax time; Apply the Edited style to the scroll viewer. Identify the scroll viewer, right click on it, and Go to Edit Template, Click Apply resource (By doing this we apply the style which we have created).

Step 12: Select the Style with the name you have specified in Step #6.

Save the application and Run it. This is how the Scroll Viewer looks like in the Browser.


You can see the Ugly and Regular Pale scroll bar in 2 and 1 is the Colorful scroll bar which we have created. Now tell me which one really Looks “ROCKING”……….!!!!

-Happy Coding


Cheers,

Sriki


Thursday, February 5, 2009

Finding the Exact coordinates of an Image for an Image Map.

Hi,

In this post, I would like to discuss about a solution for finding the exact coordinate values of and image using some Java script.

Before the solution – here is a brief description about the problem.

Image map is such a wonderful feature, which will allow you to navigate to various pages using one single image. Say if we have the Geographical Map of India & we want to navigate to different state official websites by clicking on the particular state- on the image. This looks astonishing for any Web Illiterate. But the fact is this is a very easy task to be implemented in terms of coding. But the tedious part of this whole thing is getting the coordinates.


In one of my Projects I worked I have come across an image which is in rectangular shape with rectangular shaped fields in the image. Then I started taking the coordinates using the MS Paint tool. I have manually noted down the co ordinates and copied them into the of the Image map.

And the image map worked out fine. Later on when I had to map an image of the following layout I faced a lot of ruckus in taking the coordinates. I took the coordinates in paint by placing the cursor and noting the points. But after mapping the actual hyper link was pointing at some weird places instead of the actual place. Say if I am pointing at x(40,30) it is pointing the hyperlink at x( 20,10) or so. Then with the help of one of my friends Mr. Praveen Battula I have solved the issue. Praveen has written a small snippet of code in Java Script which has greatly reduced my pain. The java script code uses the cursor position to give the exact coordinates. Here is the Code snippet


        You pointed on x = - y =


·         If you want to use this code you are to do the following things:

·         Copy the code into a new notepad.

·         Save it with any name but extension as’ .html’

·         In the Image: Url field within the braces give the path of the target image in single quotes (‘).

·         Save the file and open it in a Browser.

·         Now you will find the image and two text boxes in the browser window.

·         Place the cursor on the image and note down the coordinate that are being displayed in the text boxes below the image.

Copy the coordinates and map them using the and <> tags of the image map.

A small demo is present in the following link on how to write an image map and how does that look.

http://www.w3schools.com/TAGS/tryit.asp?filename=tryhtml_areamap


Happy Coding Folks,


Yours ,

Sriki